This section walks you through installing WinDriver on your system, including how to confirm the installation was successful and how to uninstall it if needed. Whether you're new to WinDriver or setting it up on a new platform, this guide ensures a smooth start. This page will cover:
Windows System Requirements
Please make sure that your development machine fits the following requirements:
- Any x86 32-bit or 64-bit (x64: AMD64 or Intel EM64T) processor, ARM, ARM64 processors supported by Microsoft.
- Any compiler or development environment supporting C, .NET, Java or Python.
Requirements for compiling C/C++ applications on Windows
Please make sure that your development machine fits the following requirements:
- Install Visual Studio 2013 or higher with the C/C++ workload.
- Install Windows Software Development Kit (SDK)
- For compiling a Kernel PlugIn, install Windows Driver Kit (WDK) with a matching version for your installed Windows SDK version(WDK and SDK versions numbers should be the same). See Microsoft’s website for more information.
- Alternatively, the EWDK image from Microsoft could also be used to compile WinDriver based applications without the need to install Visual Studio, SDK and WDK.
Windows Installation Instructions
- Driver installation on Windows requires administrator privileges.
- Run the WinDriver installation —
WD1650.EXE(for 32-bit) orWD1650X64.EXE(for 64-bit) orWD1650ARM64.EXE— and follow the installation instructions. - At the end of the installation, you may be prompted to reboot your computer.
The WinDriver installation defines a WD_BASEDIR environment variable, which is set to point to the location of your WinDriver directory, as selected during the installation. This variable is used during the DriverWizard code generation — it determines the default directory for saving your generated code and is used in the include paths of the generated project/make files. This variable is also used in the sample Kernel PlugIn projects and makefiles.
If the installation fails with an ERROR_FILE_NOT_FOUND error, inspect the Windows registry to see if the RunOnce key exists in HKEY_LOCAL_MACHINE\SOFTWARE \Microsoft\Windows\CurrentVersion. This registry key is required by Windows Plug-and-Play in order to properly install drivers using INF files. If the RunOnce key is missing, create it; then try installing the INF file again.
The following steps are for registered users only:
To register your copy of WinDriver with the license you received from Jungo, follow these steps:
- Start DriverWizard: Start | Programs | WinDriver | DriverWizard.
- Select the Register WinDriver option from the File menu, and insert the license string you received from Jungo.
- Click the Activate License button.
- To register source code that you developed during the evaluation period, refer to the documentation of WDU_Init() / WDC_DriverOpen().
When using the low-level WD_xxx API instead of the WDC_xxx API (which is used by default), refer to the documentation of WD_License() in this manual.
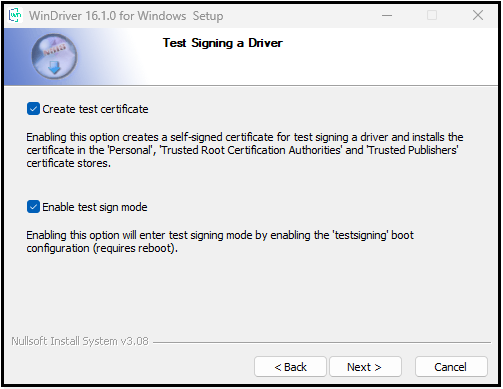
Setting up Test Signing
One of the pages in the WinDriver installer is dedicated to setting up your machine for test signing a driver package. This section contains the following options:
Create test certificatecheckbox: Checking this checkbox will create a self-signed test certificate. After the installation, you can view the certificate by double clicking the.cerfile in:$WD_BASEDIR/WinDriver1650_development.cer, or by viewing the certificate store of the local machine. In order to do that, open the run dialog box (WinKey+r) and entercertlm.msc. You will be able to see theWinDriver1650.developmentcertificate under ‘Personal’, ‘Trusted Root Certification Authorities’ and ‘Trusted Publishers’Enable test sign modecheckbox: Checking this checkbox will switch your machine to test signing mode by enabling thetestsigningboot configuration. This mode enables test-signed drivers to load.
⚠ Attention: After changing the testsigning boot configuration, a reboot is required for the changes to take effect. Once these changes take effect, you are not required to do anything else with Windows security settings during the development process (as opposed to disabling digital signature enforcement, which must be done after every reboot)
⚠ Attention: You must have administrative rights and disable Secure Boot to change the testsigning boot configuration.
Enabling or disabling this configuration can be done with wdreg.exe (see Chapter 17.3.5.1.1 Enabling and Disabling Test Signing Mode)
Uninstalling WinDriver
You can select to use the graphical wdreg_gui.exe utility instead of wdreg.exe.
wdreg.exe and wdreg_gui.exe are found in the WinDriver\util directory
(see Chapter 16: Dynamically Loading Your Driver for details regarding these utilities).
To uninstall WinDriver, please follow these steps:
- Close any open WinDriver applications, including DriverWizard, the Debug Monitor, and user-specific applications.
- If you created a Kernel PlugIn driver, uninstall and erase it:
- If your Kernel PlugIn driver is currently installed, uninstall it using the
wdregutility:
- If your Kernel PlugIn driver is currently installed, uninstall it using the
# The Kernel PlugIn driver name should be specified without the `*.sys` extension.
wdreg -name uninstall
- Erase your Kernel PlugIn driver from the
windir%\system32\driversdirectory. - Uninstall all Plug-and-Play devices (USB/PCI) that have been registered with WinDriver via an INF file:
# Uninstall a device INF using the wdreg utility:
wdreg -inf uninstall
- Verify that no INF files that register your device(s) with WinDriver’s kernel module (
windrvr1650.sys) are found in thewindir%\inf directory. - Uninstall WinDriver:
- On the development PC, on which you installed the WinDriver toolkit: Start | WinDriver | Uninstall , OR run the
uninstall.exeutility from the WinDriver installation directory. The uninstall will stop and unload the WinDriver kernel module (windrvr1650.sys); delete the copy of thewindrvr1650.inffile from thewindir%\infdirectory; delete WinDriver from Windows’ Start menu; delete the WinDriver installation directory (except for files that you added to this directory); and delete the shortcut icons to the DriverWizard and Debug Monitor utilities from the Desktop. - On a target PC, on which you installed the WinDriver kernel module (
windrvr1650.sys), but not the entire WinDriver toolkit. Use thewdregutility to stop and unload the driver:
- On the development PC, on which you installed the WinDriver toolkit: Start | WinDriver | Uninstall , OR run the
wdreg -inf uninstall
⚠ Attention: When running this command, windrvr1650.sys should reside in the same directory as windrvr1650.inf.
On the development PC, the relevant wdreg uninstall command is executed for you by the uninstall utility.
If you attempt to uninstall WinDriver while there are open handles to the WinDriver service (windrvr1650.sys or your renamed driver, or there are connected and enabled Plug-and-Play devices that are registered to work with this service, wdreg will fail to uninstall the driver. This ensures that you do not uninstall the driver while it is being used.
You can check if the WinDriver kernel module is loaded by running the Debug Monitor utility (WinDriver\util\wddebug_gui.exe). When the driver is loaded, the Debug Monitor log displays driver and OS information; otherwise, it displays a relevant error message. On the development PC, the uninstall command will delete the Debug Monitor executables; to use this utility after the uninstallation, create a copy of wddebug_gui.exe before performing the uninstall procedure.
- If
windrvr1650.syswas successfully unloaded, erase the following files (if they exist):windir%\system32\drivers\windrvr1650.syswindir%\inf\windrvr1650.infwindir%\system32\wdapi1650.dllwindir%\system32\wdapi1650_arm64.dll(Windows ARM64)windir%\sysWOW64\wdapi1650_32.dll(Windows x64)
- Reboot the computer.
Upgrading Your Installation
To upgrade to a new version, download and install a new version of WinDriver that matches your development platform, operating systems and CPU configurations of the target platforms on which you intend the driver to be used.
Open DriverWizard
Enter your new license key, if you received one.
Update Code
Pass the new license string using your usual API function.
Check Driver Name
Make sure it matches the new driver module (windrvr1650).
Rebuild Project
Using the new windrvr.h, or update the name if you use a renamed driver
Checking Your Installation
You can verify your WinDriver installation in just a few steps:
Launch DriverWizard
Open DriverWizard from /wizard/wdwizard, or via the Windows Start menu: Start → Programs → WinDriver → DriverWizard.
Confirm License Registration
If you’re a registered user, ensure your license is activated. Evaluation users can proceed without registering.
Insert Your Device
For PCI or USB, plug the device in and check that DriverWizard detects it. For ISA cards, insert the card and configure the resource settings.
Test Device Communication
Use DriverWizard to read from and write to the device, confirming proper driver operation.
Full Benefits
Guidance
Features
Technical Data

WinDriver Download Free 30 Day Trial
Software License Agreement of WinDriver (TM) Version v16.5.0
© Jungo Connectivity Ltd. 2024 All Rights Reserved
IMPORTANT – READ CAREFULLY: THIS SOFTWARE LICENSE AGREEMENT (“AGREEMENT”) IS A LEGAL AGREEMENT BETWEEN YOU AND JUNGO CONNECTIVITY LTD. (“JUNGO”), FOR THE WINDRIVER SOFTWARE PRODUCT ACCOMPANYING THIS LICENSE (THE “SOFTWARE”). BY INSTALLING, COPYING OR OTHERWISE USING THE SOFTWARE, YOU AGREE TO BE LEGALLY BOUND BY THE TERMS AND CONDITIONS OF THIS AGREEMENT. IF YOU DO NOT AGREE TO THE TERMS AND CONDITIONS OF THIS AGREEMENT, DO NOT INSTALL, COPY, OR OTHERWISE USE THE SOFTWARE.
- OWNERSHIP OF THE SOFTWARE. All right, title, and interest in and to the Software, including associated intellectual property rights, of any sort and/or kind, are and shall remain solely with Jungo and its licensors, and may be protected by copyright, trademark, patent and trade secret law and international treaties. This Agreement does not convey to you an interest in or to the Software, but only a limited, non-transferable, non-sublicensable, non-exclusive, and revocable right of use, in accordance with the terms of this Agreement. You may not remove any proprietary notices and/or any legends from the Software, in whole or in part.
- GRANT OF LICENSE. Jungo hereby grants you a personal, non-exclusive, nontransferable, non-sublicensable node-locked and time limited license to use the Software.
– Individuals: Jungo grants you, as an individual, a personal, non-exclusive, “single-user” license to use the Software on a single computer, in the manner provided below, at the site for which the license was given.
– Entities: If you are an entity, Jungo grants you the right to designate one individual within your organization (and only one) to have the right to use the Software on a single computer, in the manner provided below, at the site for which the license was given.
– License Scope: A single user license allows usage of WinDriver and redistribution of certain components (as defined below) within a single end product SKU, for a single device (identified by its VID/PID (USB) or VID/DID (PCI)), and without SDK/API capabilities. If you need extended license or distribution rights, please contact Jungo.
- EVALUATION LICENSE. If you have not yet paid license fees for the use of the Software, then Jungo hereby grants you a personal, non-exclusive, non-transferable and non-sublicensable license to internally use the Software for evaluation purposes only, for a period of 30 days (the “Evaluation License”). If, after the expiration of the Evaluation License, you wish to continue using the Software and accompanying written materials, you may do so by remitting the required payment to Jungo, and you will then receive a registration code and a license string that will permit you to use the Software on a single computer under one of the license schemes specified in Section 2 above.
- SERVICE OPTIMIZATION AND ENHANCEMENT. To continuously improve and optimize Jungo’s services, Jungo reserves the right to anonymously monitor, collect, and analyze usage data, including but not limited to API interactions, performance metrics, and system activity. Such data collection and analysis shall be conducted in compliance with all applicable laws and regulations and shall be used solely for the purpose of enhancing service performance, security, and reliability.
- SUBSCRIPTION, SERVICE CONTINUITY, RENEWAL, AND LATE PAYMENT PENALTIES. Access to the WinDriver and its associated features is provided on a subscription basis, subject to annual renewal. Failure to renew the subscription before the expiration date may result in the automatic termination of access to the platform and all related services, and additional fees (including but not limited to late payment penalties, administrative charges, or reinstatement costs). Upon termination, the user shall forfeit any rights to continued use, and we reserve the right to suspend or delete any associated accounts, data, or functionalities without further notice.
- OPEN SOURCE. The Software includes certain files that are subject to open source licenses. These files are identified in their header files (“Open Source Files”). You must use the Open Source Files in accordance with the terms of their respective licenses. In the event of any contradiction between the terms of this Agreement, and the terms of the open source license accompanying a certain Open Source File, the terms of the latter shall prevail, with regard to the said Open Source File.
RESTRICTIONS ON USE AND TRANSFER
- DISTRIBUTION OF FILES.
(a) You may not distribute, or otherwise transfer or assign, any portion of the Software, including any of the headers or source files that are included in the Software, unless otherwise expressly permitted in this Agreement, subject to the provisions of Section 4 above.
(b) Subject to your full and continued compliance with the terms of this Agreement, including the ongoing payment of annual license fees, you may distribute the following files:
Windows:
– windrvr1650.sys
– windrvr1650_legacy.sys
– windrvr1650.inf
– windrvr1650.cat
– wdapi1650.dll
– wdapi1650_32.dll
– wdapi1650_arm64.dll
– wdapi_dotnet1650.dll
– wdapi_dotnet1650_32.dll
– wdapi_netcore1650.dll
– wdapi_java1650.dll
– wdapi_java1650.jar
– wdreg.exe
– difxapi.dll
– devcon.exe
Linux:
– windrvr_gcc_v3.o_shipped
– windrvr_gcc_v3_regparm.o_shipped
– kp_linux_gcc_v3.o
– kp_linux_gcc_v3_regparm.o
– libwdapi1650.so libwdapi1650_32.so
– libwdapi_java1650.so
– libwdapi_java1650_32.so
– wdapi_java1650.jar
– wdapi_netcore1650.dll
– kp_wdapi1650_gcc_v3.o_shipped
– kp_wdapi1650_gcc_v3_regparm.o_shipped
– linux_wrappers.c
– linux_wrappers.h
– wdusb_linux.c
– wdusb_interface.h
– wd_ver.h
– linux_common.h
– windrvr.h
– windrvr_usb.h
– wdsriov_interface.h
– wdsriov_linux.c
– wdreg
– configure makefile.in
– configure.wd makefile.wd.in
– makefile.wd.kbuild.in
– configure.usb
– makefile.usb.in
– makefile.usb.kbuild.in
– setup_inst_dir
macOS:
– libwdapi1650.dyld
– libwdapi_java1650.jar
– libwdapi_java1650.dyld
– wdapi_netcore1650.dll
– WinDriver1650.kext
– WinDriver1650.dext
– wd_mac_install.sh
– wd_mac_uninstall.sh
(c) The files listed in Section 5.b above may be distributed only as part of a complete application that you distribute under your organization name, and only if they significantly contribute to the functionality of your application. For avoidance of doubt, each organization distributing these files as part of the organization products is required to have valid license(s) under the organization name/VID, irrespective of the party who actually performed the product development. Licenses granted to subcontractors do not grant distribution or other rights to the organizations for which they are developing.
(d) The distribution of the windrvr.h header file is permitted only on Linux.
(e) You may not modify the distributed files specified in Section 5.b of this Agreement.
(f) You may not distribute any header file that describes the WinDriver functions, or functions that call the WinDriver functions and have the same basic functionality as that of the WinDriver functions.
- The Software may not be used to develop a development product, an API, or any products, which will eventually be part of a development product or environment, without the written consent of Jungo and subject to additional fees and licensing terms.
- You may make printed copies of the written materials accompanying the Software, provided that only users bound by this license use them.
- You may not allow any third party to use the Software, grant access to the Software (or any portion thereof) to any third party, or otherwise make any commercial use of the Software, including without limitation, assign, distribute, sublicense, transfer, pledge, lease, rent, or share your rights in the Software or any of your rights under this Agreement, all whether or not for any consideration.
- You may not translate, reverse engineer, decompile, disassemble, reproduce, duplicate, copy, or otherwise disseminate all or any part of the Software, or extract source code from the object code of the Software.
- Jungo reserves the right to revise, update, change, modify, add to, supplement, or delete any and all terms of this License Agreement; provided, however, that changes to this License Agreement will not be applied retroactively. Such changes will be effective with or without prior notice to you. You can review the most current version of this License Agreement under the WinDriver download form page.
- You may not incorporate or link any open source software with any open source software part of the Software, or otherwise take any action which may cause the Software or any portion thereof to be subjected to the terms of the Free Software Foundation’s General Public License (GPL) or Lesser General Public License (LGPL), or of any other open source code license.
- DISCLAIMER OF WARRANTY. THIS SOFTWARE AND ITS ACCOMPANYING WRITTEN MATERIALS ARE PROVIDED BY JUNGO “AS IS” WITHOUT ANY WARRANTY. ANY EXPRESS OR IMPLIED WARRANTIES, INCLUDING, BUT NOT LIMITED TO, THE IMPLIED WARRANTIES OF MERCHANTABILITY, FITNESS FOR A PARTICULAR PURPOSE, AND NON-INFRINGEMENT, ARE HEREBY DISCLAIMED TO THE FULLEST EXTENT PERMITTED UNDER APPLICABLE LAW.
- NO LIABILITY. TO THE FULLEST EXTENT PERMITTED BY APPLICABLE LAW, IN NO EVENT SHALL JUNGO OR ITS LICENSORS BE LIABLE FOR ANY DIRECT, INDIRECT, INCIDENTAL, SPECIAL, EXEMPLARY, OR CONSEQUENTIAL DAMAGES (INCLUDING, BUT NOT LIMITED TO, PROCUREMENT OF SUBSTITUTE GOODS OR SERVICES; LOSS OF USE, DATA, SAVINGS, IP INFRINGEMENT OR PROFITS; OR BUSINESS INTERRUPTION) HOWEVER CAUSED AND ON ANY THEORY OF LIABILITY, WHETHER IN CONTRACT, STRICT LIABILITY, OR TORT (INCLUDING NEGLIGENCE OR OTHERWISE) ARISING IN ANY WAY OUT OF THE USE OF THIS SOFTWARE, EVEN IF ADVISED OF THE POSSIBILITY OF SUCH DAMAGE.
- Governing Law. This Agreement and use of the Software are governed by the laws of the State of Israel, regardless of its conflict of laws rules, and the competent courts of the State of Israel shall have sole and exclusive jurisdiction over any dispute under this Agreement or otherwise related to the Software.
- Confidentiality. The Software, including any additional information related thereto, contains confidential and proprietary information of Jungo. Accordingly, you agree that you will not, nor allow any third party to, disseminate, transfer, grant access to, or otherwise disclose to any third party the Software or any part thereof or any other confidential or proprietary information of Jungo provided in connection therewith. You will maintain all copies of the Software and all related documentation in confidence.
- Termination and Effects of Termination. Jungo may terminate this Agreement and the licenses granted to you hereunder at any time if you breach any of your obligations hereunder, by issuance of written notice to such effect, addressed to you at the address you provided in your registration form. Upon expiration or other termination of this Agreement, the Licenses granted to you hereunder shall immediately and automatically be canceled, and you will immediately remove all copies of the Software from your computer(s) and cease any use thereof.
- Contact Details. If you have any questions concerning this Agreement or wish to contact Jungo for any reason —
Web site: https://www.jungo.com
Email: [email protected]
- US GOVERNMENT RESTRICTED RIGHTS. The Software and documentation are provided with RESTRICTED RIGHTS.
Use, duplication, or disclosure by the Government is subject to restrictions set forth in subparagraph (c)(1) of The Rights in Technical Data and Computer Software clause at DFARS 252.227-7013 or subparagraphs (c)(1)(ii) and (2) of Commercial Computer Software – Restricted Rights at 48 CFR 52.227-19, as applicable.
- Automatic Renewal. The subscription shall be automatically renewed, unless Licensee notifies Licensor 30 days or more prior to the expiration date of the subscription, of its intent not to renew the subscription.