Then install the registered version of WinDriver on your development machine by following the installation instructions. If you have already installed an evaluation version of WinDriver, you can jump directly to the installation steps for registered users to activate your license.
Windows Driver Distribution
Distributing the driver you created is a multi-step process.
First, create a distribution package that includes all the files required for the installation of the driver on the target computer.
Second, install the driver on the target machine. This involves installing windrvr1650.sys or <projectname>.sys, windrvr1650.inf or <projectname>_driver.inf, installing the specific INF file for your device and installing your Kernel PlugIn driver (if you have created one). These steps can be performed using the wdreg utility.
Note also the option to simplify the installation of the <projectname>_device.inf and <projectname>_driver.inf using the generated DriverWizard <projectname>_install.bat script.
Finally, you need to execute the hardware-control application that you developed with WinDriver.
ℹ️ Note: It is also important to mention that all OS references in this document are applicable only to WinDriver versions that officially support these operating systems.
Preparing the Distribution Package
Prepare a distribution package that includes the following files.
⚠ Attention: If you wish to distribute drivers for both 32-bit and 64-bit target platforms, you must prepare separate distribution packages for each platform. The required files for each package are provided in the WinDriver installation directory for the respective platform.
Mandatory Files
| File | Distribution using WinDriver (No Renaming) | Distribution of a Renamed Driver |
|---|---|---|
| Your hardware-control application/DLL. | Your user application.
Note: The value you pass WD_DriverName() should be |
Your user application.
Note: The value you pass WD_DriverName() should be your renamed driver name. |
| .sys | WinDriver\redist\windrvr1650.sys |
<projectname>\<projectname>_installation\redist\<projectname>.sys |
| .inf (driver) | WinDriver\redist\windrvr1650.inf |
<projectname>\<projectname>_installation\redist\<projectname>_driver.inf |
| .inf (device) | Could be generated using DriverWizard | <projectname>\<projectname>_installation\redist\<projectname>_device.inf |
| .cat (for driver INF) | WinDriver\redist\windrvr1650.cat |
Can be created using Inf2Cat (provided with WDK).
For information about Jungo’s Windows Digital Driver Signing Service contact us at: Attention: The |
Kernel Plugin Files
If you have created a Kernel PlugIn driver: Add your Kernel PlugIn driver — .sys to your distribution package.
WinDriver API
Add a copy of wdapi, based on your target platform:
| Platform | File Name | Distribution using WinDriver (No Renaming) | Distribution of a Renamed Driver |
|---|---|---|---|
| 32-bit binaries for x86 target platforms 64-bit binaries for x86_64 platforms |
wdapi1650.dll |
WinDriver\redist\wdapi1650.dll |
<projectname>\<projectname>_installation\redist\wdapi1650.dll |
| 32-bit binaries for x86_64 platforms | wdapi1650_32.dll |
WinDriver\redist\wdapi1650_32.dll |
<projectname>\<projectname>_installation\redist\wdapi1650_32.dll |
| 64-bit binaries for ARM64 platforms | wdapi1650_arm64.dll |
WinDriver\redist\wdapi1650_arm64.dll |
<projectname>\<projectname>_installation\redist\wdapi1650_arm64.dll |
Language Specific Files
The following subsections explain which language specific files to add to your distribution package.
Note: If your project is written in a language that is not specified in the following subsections, then there are no additional files you need to add to your distribution package.
C#.NET/VB.NET Distribution Package
If your user application is a C#.NET/VB.NET application/DLL you must also add:
| Platform | File Name | Distribution using WinDriver (No Renaming) | Distribution of a Renamed Driver |
|---|---|---|---|
| 32-bit binaries for x86 target platforms 64-bit binaries for x86_64 platforms |
wdapi_dotnet1650.dll |
WinDriver\lib\wdapi_dotnet1650.dll |
<projectname>\<projectname>_installation\lib\wdapi_dotnet1650.dll |
| 32-bit binaries for x86_64 platforms | wdapi_dotnet1650_32.dll |
WinDriver\lib\wdapi_dotnet1650_32.dll |
<projectname>\<projectname>_installation\lib\wdapi_dotnet1650_32.dll |
C#.NET Core Distribution Package
If your user application is a C#.NET Core application/DLL you must also add:
| Platform | File Name | Distribution using WinDriver (No Renaming) | Distribution of a Renamed Driver |
|---|---|---|---|
| 32-bit binaries for x86 target platforms 64-bit binaries for x86_64 platforms |
wdapi_netcore1650.dll |
WinDriver\lib\wdapi_netcore1650.dll |
<projectname>\<projectname>_installation\lib\wdapi_netcore1650.dll |
| 32-bit binaries for x86_64 platforms | wdapi_netcore1650_32.dll |
WinDriver\lib\wdapi_netcore1650_32.dll |
<projectname>\<projectname>_installation\lib\wdapi_netcore1650_32.dll |
| 64-bit binaries compiled on x64 platform for ARM64 platforms | arm64\wdapi_netcore1650.dll |
WinDriver\lib\arm64\wdapi_netcore1650.dll |
<projectname>\<projectname>_installation\lib\arm64\wdapi_netcore1650.dll |
Java Distribution Package
If your user application is a Java application/DLL you must also add:
| Platform | File Name | Distribution using WinDriver (No Renaming) | Distribution of a Renamed Driver |
|---|---|---|---|
| 32-bit binaries for x86 target platforms 64-bit binaries for x86_64 platforms |
wdapi_java1650.dllwdapi_java1650.jar |
WinDriver\lib\wdapi_java1650.dllWinDriver\lib\wdapi_java1650.jar |
<projectname>\<projectname>_installation\lib\wdapi_java1650.dll<projectname>\<projectname>_installation\lib\wdapi_java1650.jar |
| 64-bit binaries compiled on x64 platform for ARM64 platforms | wdapi_java1650.dllwdapi_java1650.jar |
WinDriver\lib\arm64\wdapi_java1650.dllWinDriver\lib\arm64\wdapi_java1650.jar |
<projectname>\<projectname>_installation\lib\wdapi_java1650.dll<projectname>\<projectname>_installation\lib\wdapi_java1650.jar |
Testing Machine Distribution Package
⚠ Attention: On Windows 10 or higher you must disable digital signature enforcement in order to install unsigned INF files generated by the DriverWizard, or enter test signing mode and create a WinDriver test certificate (using wdreg) in order to install test signed INF files generated by the DriverWizard. See 17.3.4. Temporary disabling digital signature enforcement in Windows 10 and 17.3.5.3 How to Generate Test Signed INF Files in DriverWizard Code Generation?. Make sure that this was done prior to performing the following steps, otherwise they will not work.
If you are preparing a distribution package for a testing machine and you chose to enable test signed INF files in DriverWizard code generation, in addition to the files listed above, in order to install the test signed INF files, you must also add:
⚠ Attention: The following files are for development and testing use only and should NOT be distributed.
| File Name | Distribution using WinDriver (No Renaming) | Distribution of a Renamed Driver |
|---|---|---|
| .cer file of the certificate used to sign the INF | Copy the .cer file used to sign the cat file, the default .cer file is:WinDriver\WinDriver1650.cer |
<projectname>\<projectname>_installation\redist\<certificate_name>.cer |
| install_test_cert.bat uninstall_test_cert.bat |
<projectname>\<projectname>_installation\redist\install_test_cert.bat<projectname>\<projectname>_installation\redist\uninstall_test_cert.bat |
|
| .cat | .cat file for device INF can be generated in the Generate .INF file dialog |
<projectname>\<projectname>_installation\redist\<projectname>.cat
Note: The above catalog file contains a signature for both driver INF and device INF. |
For installing the test signed INF files on a testing machine, see Chapter 17.3.5.2.2 Steps for Installing Test Signed INF Files on a Testing Machine
Installing Your Driver on the Target Computer
⚠ Attention: All references to wdreg in the following section can be replaced with wdreg_gui, which offers the same functionality as wdreg but displays GUI messages instead of console-mode messages.
⚠ Attention: The wdreg.exe utility, included in the x64 version of WinDriver is different than the wdreg.exe utility included in the ARM64 version of WinDriver. To run the x64 version of wdreg.exe on an ARM64 platform, add the -compat flag to the cmmand.
⚠ Attention: wdreg.exe / wdreg_gui.exe can be found in the WinDriver\util directory.
Driver installation on Windows requires administrator privileges.
Follow the instructions below in the specified order to properly install your driver on the target computer:
Preliminary Steps
Close Open Handles to your Kernel Module
To successfully install your driver, make sure that there are no open handles to the WinDriver service (windrvr1650.sys or your renamed driver <projectname>.sys), and that there are no connected and enabled Plug-and-Play devices that are registered with this service. If the service is being used, attempts to install the new driver using wdreg will fail. This is relevant, for example, when upgrading from an earlier version of the driver that uses the same driver name. You can disable or uninstall connected devices from the Device Manager (Properties | Disable/Uninstall) or using wdreg, or otherwise physically disconnect the device(s) from the PC.
This includes closing any applications that may be using the driver, uninstalling your old Kernel PlugIn driver (if you had created such a driver) and either disabling, uninstalling, or physically disconnecting any device that is registered to work with the WinDriver service. The command to uninstall old kernel plugins is as follows:
wdreg -name OLD_KP uninstall
⚠ Attention: Since version 11.9.0 of WinDriver, the default driver module name includes the WinDriver version, so if you do not rename the driver to a previously-used name there should not be any conflicts with older drivers.
How to Avoid Overwriting The Newest Version of your Kernel Module
When distributing your driver, you should attempt to ensure that the installation does not overwrite a newer version of windrvr1650.sys with an older version of the file in the Windows drivers directory (windir%\system32\drivers). You can do this by, for example, configuring your installation program (if you are using one) or your INF file so that the installer automatically compares the time stamp on these two files and does not overwrite a newer version with an older one.
The provided windrvr1650.inf file uses the COPYFLG_NO_VERSION_DIALOG directive, which is designed to avoid overwriting a file in the destination directory with the source file if the existing file is newer than the source file.
There is also a similar COPYFLG_OVERWRITE_OLDER_ONLY directive that is designed to ensure that the source file is copied to the destination directory only if the destination file is superseded by a newer version.
Note, however, that both of these INF directives are irrelevant to digitally signed drivers. As explained in the Microsoft INF CopyFiles Directive documentation — https://msdn.microsoft.com/en-us/library/ff546346%28v=vs.85%29.aspx — if a driver package is digitally signed, Windows installs the package as a whole and does not selectively omit files in the package based on other versions already present on the computer.
Install WinDriver’s Kernel Module or your Renamed Kernel Module
Copy the following files to the same directory.
| File | Distribution using WinDriver (No Renaming) | Distribution of a Renamed Driver |
|---|---|---|
| .sys | WinDriver\redist\windrvr1650.sys |
<projectname>\<projectname>_installation\redist\<projectname>.sys |
| .inf (driver) | WinDriver\redist\windrvr1650.inf |
<projectname>\<projectname>_installation\redist\<projectname>_driver.inf |
| .cat (for driver INF) | WinDriver\redist\windrvr1650.cat |
If the package is for distribution: You can create this file using Inf2Cat (provided with WDK).
If the package is for testing: Attention: The .cat file provided in |
⚠ Attention
windrvr1650.cat contains the driver’s Authenticode digital signature. To maintain the signature’s validity this file must be found in the same installation directory as the
windrvr1650.inf file. If you select to distribute the catalog and INF files in different directories, or make any changes to these files or to any other files referred to by the catalog file (such as windrvr1650.sys), you will need to do either of the following:
- Create a new catalog file and re-sign the driver using this file.
- Comment-out or remove the following line in the
windrvr1650.inffile:
CatalogFile=windrvr1650.cat
and not include the catalog file in your driver distribution. However, note that this option invalidates the driver’s digital signature.
Use the utility wdreg.exe to install WinDriver’s kernel module on the target computer:
wdreg -inf install
For example, if windrvr1650.inf and windrvr1650.sys are in the d:\MyDevice directory on the target computer, the command should be:
wdreg -inf d:\MyDevice\windrvr1650.inf install
You can find the executable of wdreg in the WinDriver package under the WinDriver\util directory.
⚠ Attention: wdreg is an interactive utility. If it fails, it will display a message instructing the user how to overcome the problem. In some cases the user may be asked to reboot the computer.
Note: The windrvr1650.sys driver provided by Jungo is digitally signed.
Install the INF file for your device
Install the INF file for your device (registering your Plug-and-Play device with windrvr1650.sys):
Run the utility wdreg with the install command to automatically install the INF file and update the Windows Device Manager:
wdreg -inf [path to your device INF file] install
You can also use the wdreg utility’s preinstall command to pre-install an INF file for a device that is not currently connected to the PC:
wdreg -inf [path to your device INF file] preinstall
If the installation fails with an ERROR_FILE_NOT_FOUND error, inspect the Windows registry to see if the RunOnce key exists in HKEY_LOCAL_MACHINE\SOFTWARE\Microsoft\Windows\CurrentVersion. This registry key is required by Windows Plug-and-Play in order to properly install drivers using INF files. If the RunOnce key is missing, create it; then try installing the INF file again.
Install your Kernel PlugIn
Driver installation on Windows requires administrator privileges.
If you have created a Kernel PlugIn driver, follow the additional instructions below:
- Copy your Kernel PlugIn driver (
<KP driver name>.sys) to Windows drivers directory on the target computer (%windir%\system32\drivers). - Use the utility
wdreg.exeto add your Kernel PlugIn driver to the list of device drivers Windows loads on boot. Use the following installation command to install a SYS Kernel PlugIn Driver:
wdreg -name [Your driver name, without the *.sys extension] install
You can find the executable of wdreg in the WinDriver package under the WinDriver\util directory.
⚠ Attention: The wdreg.exe utility, included in the x64 version of WinDriver is different than the wdreg.exe utility included in the ARM64 version of WinDriver. To run the x64 version of wdreg.exe on an ARM64 platform, add the -compat flag to the cmmand.
Install the WinDriver API
If your hardware-control application/DLL uses wdapi1650.dll (as is the case for the sample and generated DriverWizard WinDriver projects), copy this DLL to the target’s shared library directory, according to the application/target platform as shown in the table:
| Platform | File from Distribution package (No Renaming) | Destination on Target |
|---|---|---|
| 32-bit applications/DLLs for x86 targets 64-bit applications/DLLs for x86_64 targets |
wdapi1650.dll |
%windir%\system32 |
| 32-bit applications/DLLs for x86_64 targets | wdapi1650_32.dll |
%windir%\sysWOW64 |
| 64-bit applications/DLLs compiled on ARM64 or x64 platform for ARM64 targets |
wdapi1650_arm64.dll |
%windir%\system32 |
⚠ Attention: If you attempt to write a 32-bit installation program that installs a 64-bit program, and therefore copies the 64-bit wdapi1650.dll DLL to the %windir%\system32 directory, you may find that the file is actually copied to the 32-bit %windir%\sysWOW64 directory. The reason for this is that Windows x64 platforms translate references to 64-bit directories from 32-bit commands into references to 32-bit directories. You can avoid the problem by using 64-bit commands to perform the necessary installation steps from your 32-bit installation program. The system64.exe program, provided in the WinDriver\redist directory of the Windows x64 WinDriver distributions, enables you to do this.
Install your hardware-control application/DLL
Copy your hardware-control application / DLL to the target and run it!
Redistribute Your WinDriver-based package as a self-extracting EXE
Starting from WinDriver version 14.3, WinDriver supports creation of NSIS installers for Windows for your generated code and user applications, via a CMake Project compiled on Visual Studio 2019 or higher.
Note: For further debugging or troubleshooting of driver installation issues, refer to windir%/INF/setupapi.dev.log
The Installer
What the Installer does:
- Packs your driver and your user application into a single self-extracting EXE file.
- Installs the user application files to the target computer.
- Installs the driver package (INF files) to the target computer using the
wdregutility. - Provides the user with an uninstall EXE file that removes the user application and the driver from the target computer.
This allows to save users precious time in manually creating a redistribution package.
Requirements
Make sure Visual Studio 2019 or higher is installed along with the “C++ CMake Tools for Windows” and “Desktop development with C++” components installed.
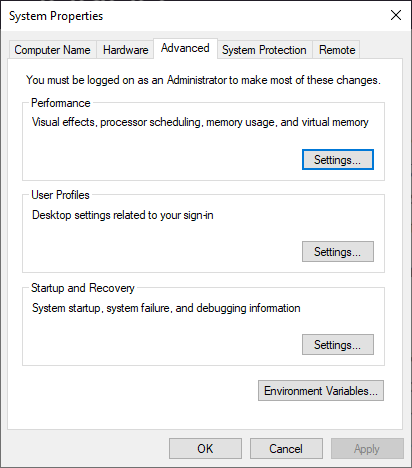
As the next step, please make sure NSIS is installed if you haven’t already installed it on your development machine. If it is not, you can download it from the NSIS website. Make sure that the PATH environment variable includes the path to makensis.exe. This can be done the following way:
- In the Start Menu type
Edit the system environment variables, this will open theSystem PropertiesWindow. - Click the Environment Variables… button.
- Edit the
PathVariable and make sure it includes the path toMakeNSIS.exe(e.g.C:\Program Files\NSIS)
Editing Environment Variables
Instructions
Follow these steps:
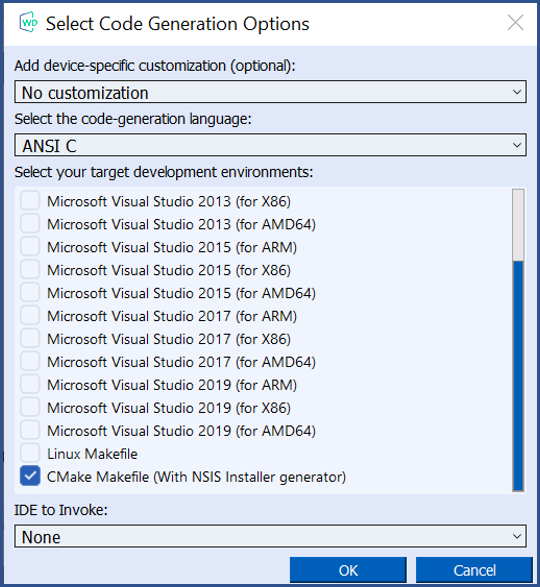
- From the DriverWizard code generation window – check the CMake Makefile (With NSIS Installer Generator) Checkbox.
WinDriver Code Generation Window
- In your generated code directory for your driver (
xxxwill be the driver name in this tutorial) found inWinDriver\wizard\my_projects\xxxyou should find aCMakeLists.txtfile. - Open Visual Studio 2019 or higher.
- Go to File | Open | CMake and choose
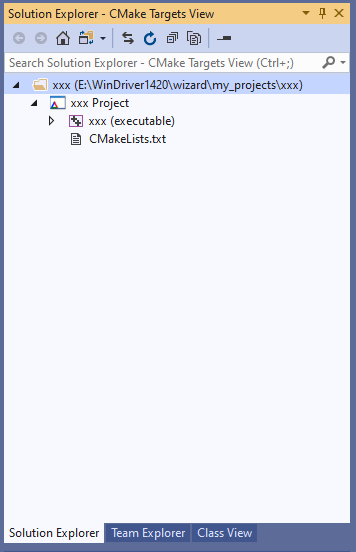
WinDriver\wizard\my_projects\xxx\CMakeLists.txt. - After all background tasks are complete you will be able to change Solution Explorer to the CMake Targets View from the Switch Views icon in the Solution Explorer.
Changing to CMake Targets View

The CMake Targets View
- In order to start preparing your distribution package – you must compile it in Release configuration.
- In order to redistribute your driver – edit
xxx_lib.csuch thatXXX_DEFAULT_LICENSE_STRINGwill be defined to be your license string, and thatXXX_DEFAULT_DRIVER_NAMEwill be defined to be your renamed driver name (in this casexxx). If you do not perform this step your user application might work on your development computer but will not work on the target computer.
License String replacement in code

- Build the project by right clicking xxx Project | Build All from the Solution Explorer. You should find a compiled
xxx.exefile of your generated code in
WinDriver\wizard\my_projects\xxx\out\build\(PLATFORM_NAME)\WIN32and an additional installer EXE filexxx_1.0.0-win64.exe
inWinDriver\wizard\my_projects\xxx\out\build\(PLATFORM_NAME).
Jungo recommends using the installer EXE file for distributing your driver package. - Feel free to modify the
CMakeLists.txtfile to better suit for your needs.
⚠ Attention: Before installing the driver on a Windows-based target machine, either digitally sign the driver or disable Digital Signature enforcement. In addition, make sure to run the installer EXE as Administrator to make sure it has privileges to install drivers. Failure to do so might result in the driver not being installed properly on the target machine.

Full Benefits
Guidance
Features
Technical Data

WinDriver Download Free 30 Day Trial
Software License Agreement of WinDriver (TM) Version v16.5.0
© Jungo Connectivity Ltd. 2024 All Rights Reserved
IMPORTANT – READ CAREFULLY: THIS SOFTWARE LICENSE AGREEMENT (“AGREEMENT”) IS A LEGAL AGREEMENT BETWEEN YOU AND JUNGO CONNECTIVITY LTD. (“JUNGO”), FOR THE WINDRIVER SOFTWARE PRODUCT ACCOMPANYING THIS LICENSE (THE “SOFTWARE”). BY INSTALLING, COPYING OR OTHERWISE USING THE SOFTWARE, YOU AGREE TO BE LEGALLY BOUND BY THE TERMS AND CONDITIONS OF THIS AGREEMENT. IF YOU DO NOT AGREE TO THE TERMS AND CONDITIONS OF THIS AGREEMENT, DO NOT INSTALL, COPY, OR OTHERWISE USE THE SOFTWARE.
- OWNERSHIP OF THE SOFTWARE. All right, title, and interest in and to the Software, including associated intellectual property rights, of any sort and/or kind, are and shall remain solely with Jungo and its licensors, and may be protected by copyright, trademark, patent and trade secret law and international treaties. This Agreement does not convey to you an interest in or to the Software, but only a limited, non-transferable, non-sublicensable, non-exclusive, and revocable right of use, in accordance with the terms of this Agreement. You may not remove any proprietary notices and/or any legends from the Software, in whole or in part.
- GRANT OF LICENSE. Jungo hereby grants you a personal, non-exclusive, nontransferable, non-sublicensable node-locked and time limited license to use the Software.
– Individuals: Jungo grants you, as an individual, a personal, non-exclusive, “single-user” license to use the Software on a single computer, in the manner provided below, at the site for which the license was given.
– Entities: If you are an entity, Jungo grants you the right to designate one individual within your organization (and only one) to have the right to use the Software on a single computer, in the manner provided below, at the site for which the license was given.
– License Scope: A single user license allows usage of WinDriver and redistribution of certain components (as defined below) within a single end product SKU, for a single device (identified by its VID/PID (USB) or VID/DID (PCI)), and without SDK/API capabilities. If you need extended license or distribution rights, please contact Jungo.
- EVALUATION LICENSE. If you have not yet paid license fees for the use of the Software, then Jungo hereby grants you a personal, non-exclusive, non-transferable and non-sublicensable license to internally use the Software for evaluation purposes only, for a period of 30 days (the “Evaluation License”). If, after the expiration of the Evaluation License, you wish to continue using the Software and accompanying written materials, you may do so by remitting the required payment to Jungo, and you will then receive a registration code and a license string that will permit you to use the Software on a single computer under one of the license schemes specified in Section 2 above.
- SERVICE OPTIMIZATION AND ENHANCEMENT. To continuously improve and optimize Jungo’s services, Jungo reserves the right to anonymously monitor, collect, and analyze usage data, including but not limited to API interactions, performance metrics, and system activity. Such data collection and analysis shall be conducted in compliance with all applicable laws and regulations and shall be used solely for the purpose of enhancing service performance, security, and reliability.
- SUBSCRIPTION, SERVICE CONTINUITY, RENEWAL, AND LATE PAYMENT PENALTIES. Access to the WinDriver and its associated features is provided on a subscription basis, subject to annual renewal. Failure to renew the subscription before the expiration date may result in the automatic termination of access to the platform and all related services, and additional fees (including but not limited to late payment penalties, administrative charges, or reinstatement costs). Upon termination, the user shall forfeit any rights to continued use, and we reserve the right to suspend or delete any associated accounts, data, or functionalities without further notice.
- OPEN SOURCE. The Software includes certain files that are subject to open source licenses. These files are identified in their header files (“Open Source Files”). You must use the Open Source Files in accordance with the terms of their respective licenses. In the event of any contradiction between the terms of this Agreement, and the terms of the open source license accompanying a certain Open Source File, the terms of the latter shall prevail, with regard to the said Open Source File.
RESTRICTIONS ON USE AND TRANSFER
- DISTRIBUTION OF FILES.
(a) You may not distribute, or otherwise transfer or assign, any portion of the Software, including any of the headers or source files that are included in the Software, unless otherwise expressly permitted in this Agreement, subject to the provisions of Section 4 above.
(b) Subject to your full and continued compliance with the terms of this Agreement, including the ongoing payment of annual license fees, you may distribute the following files:
Windows:
– windrvr1650.sys
– windrvr1650_legacy.sys
– windrvr1650.inf
– windrvr1650.cat
– wdapi1650.dll
– wdapi1650_32.dll
– wdapi1650_arm64.dll
– wdapi_dotnet1650.dll
– wdapi_dotnet1650_32.dll
– wdapi_netcore1650.dll
– wdapi_java1650.dll
– wdapi_java1650.jar
– wdreg.exe
– difxapi.dll
– devcon.exe
Linux:
– windrvr_gcc_v3.o_shipped
– windrvr_gcc_v3_regparm.o_shipped
– kp_linux_gcc_v3.o
– kp_linux_gcc_v3_regparm.o
– libwdapi1650.so libwdapi1650_32.so
– libwdapi_java1650.so
– libwdapi_java1650_32.so
– wdapi_java1650.jar
– wdapi_netcore1650.dll
– kp_wdapi1650_gcc_v3.o_shipped
– kp_wdapi1650_gcc_v3_regparm.o_shipped
– linux_wrappers.c
– linux_wrappers.h
– wdusb_linux.c
– wdusb_interface.h
– wd_ver.h
– linux_common.h
– windrvr.h
– windrvr_usb.h
– wdsriov_interface.h
– wdsriov_linux.c
– wdreg
– configure makefile.in
– configure.wd makefile.wd.in
– makefile.wd.kbuild.in
– configure.usb
– makefile.usb.in
– makefile.usb.kbuild.in
– setup_inst_dir
macOS:
– libwdapi1650.dyld
– libwdapi_java1650.jar
– libwdapi_java1650.dyld
– wdapi_netcore1650.dll
– WinDriver1650.kext
– WinDriver1650.dext
– wd_mac_install.sh
– wd_mac_uninstall.sh
(c) The files listed in Section 5.b above may be distributed only as part of a complete application that you distribute under your organization name, and only if they significantly contribute to the functionality of your application. For avoidance of doubt, each organization distributing these files as part of the organization products is required to have valid license(s) under the organization name/VID, irrespective of the party who actually performed the product development. Licenses granted to subcontractors do not grant distribution or other rights to the organizations for which they are developing.
(d) The distribution of the windrvr.h header file is permitted only on Linux.
(e) You may not modify the distributed files specified in Section 5.b of this Agreement.
(f) You may not distribute any header file that describes the WinDriver functions, or functions that call the WinDriver functions and have the same basic functionality as that of the WinDriver functions.
- The Software may not be used to develop a development product, an API, or any products, which will eventually be part of a development product or environment, without the written consent of Jungo and subject to additional fees and licensing terms.
- You may make printed copies of the written materials accompanying the Software, provided that only users bound by this license use them.
- You may not allow any third party to use the Software, grant access to the Software (or any portion thereof) to any third party, or otherwise make any commercial use of the Software, including without limitation, assign, distribute, sublicense, transfer, pledge, lease, rent, or share your rights in the Software or any of your rights under this Agreement, all whether or not for any consideration.
- You may not translate, reverse engineer, decompile, disassemble, reproduce, duplicate, copy, or otherwise disseminate all or any part of the Software, or extract source code from the object code of the Software.
- Jungo reserves the right to revise, update, change, modify, add to, supplement, or delete any and all terms of this License Agreement; provided, however, that changes to this License Agreement will not be applied retroactively. Such changes will be effective with or without prior notice to you. You can review the most current version of this License Agreement under the WinDriver download form page.
- You may not incorporate or link any open source software with any open source software part of the Software, or otherwise take any action which may cause the Software or any portion thereof to be subjected to the terms of the Free Software Foundation’s General Public License (GPL) or Lesser General Public License (LGPL), or of any other open source code license.
- DISCLAIMER OF WARRANTY. THIS SOFTWARE AND ITS ACCOMPANYING WRITTEN MATERIALS ARE PROVIDED BY JUNGO “AS IS” WITHOUT ANY WARRANTY. ANY EXPRESS OR IMPLIED WARRANTIES, INCLUDING, BUT NOT LIMITED TO, THE IMPLIED WARRANTIES OF MERCHANTABILITY, FITNESS FOR A PARTICULAR PURPOSE, AND NON-INFRINGEMENT, ARE HEREBY DISCLAIMED TO THE FULLEST EXTENT PERMITTED UNDER APPLICABLE LAW.
- NO LIABILITY. TO THE FULLEST EXTENT PERMITTED BY APPLICABLE LAW, IN NO EVENT SHALL JUNGO OR ITS LICENSORS BE LIABLE FOR ANY DIRECT, INDIRECT, INCIDENTAL, SPECIAL, EXEMPLARY, OR CONSEQUENTIAL DAMAGES (INCLUDING, BUT NOT LIMITED TO, PROCUREMENT OF SUBSTITUTE GOODS OR SERVICES; LOSS OF USE, DATA, SAVINGS, IP INFRINGEMENT OR PROFITS; OR BUSINESS INTERRUPTION) HOWEVER CAUSED AND ON ANY THEORY OF LIABILITY, WHETHER IN CONTRACT, STRICT LIABILITY, OR TORT (INCLUDING NEGLIGENCE OR OTHERWISE) ARISING IN ANY WAY OUT OF THE USE OF THIS SOFTWARE, EVEN IF ADVISED OF THE POSSIBILITY OF SUCH DAMAGE.
- Governing Law. This Agreement and use of the Software are governed by the laws of the State of Israel, regardless of its conflict of laws rules, and the competent courts of the State of Israel shall have sole and exclusive jurisdiction over any dispute under this Agreement or otherwise related to the Software.
- Confidentiality. The Software, including any additional information related thereto, contains confidential and proprietary information of Jungo. Accordingly, you agree that you will not, nor allow any third party to, disseminate, transfer, grant access to, or otherwise disclose to any third party the Software or any part thereof or any other confidential or proprietary information of Jungo provided in connection therewith. You will maintain all copies of the Software and all related documentation in confidence.
- Termination and Effects of Termination. Jungo may terminate this Agreement and the licenses granted to you hereunder at any time if you breach any of your obligations hereunder, by issuance of written notice to such effect, addressed to you at the address you provided in your registration form. Upon expiration or other termination of this Agreement, the Licenses granted to you hereunder shall immediately and automatically be canceled, and you will immediately remove all copies of the Software from your computer(s) and cease any use thereof.
- Contact Details. If you have any questions concerning this Agreement or wish to contact Jungo for any reason —
Web site: https://www.jungo.com
Email: [email protected]
- US GOVERNMENT RESTRICTED RIGHTS. The Software and documentation are provided with RESTRICTED RIGHTS.
Use, duplication, or disclosure by the Government is subject to restrictions set forth in subparagraph (c)(1) of The Rights in Technical Data and Computer Software clause at DFARS 252.227-7013 or subparagraphs (c)(1)(ii) and (2) of Commercial Computer Software – Restricted Rights at 48 CFR 52.227-19, as applicable.
- Automatic Renewal. The subscription shall be automatically renewed, unless Licensee notifies Licensor 30 days or more prior to the expiration date of the subscription, of its intent not to renew the subscription.